wattymelons
I haven't done anything nice for you lately
so I thought I would show you
how to make a set of watermelon coasters
I have had such nice feed back
on the ones I made the other day
I thought you would like to see how
easy and quick they are to make
NOW
I made a big one for the friend
these are small slices
:)
and as the weekend is coming up
they can be made in no time
and you'll have something
new and cute
to use on the
patio
balcony
porch
picnic table
rug on the grass
(?)
or where ever it is you'll be
so here we go
I use US terms
because I don't know the others
so figure it out
from what I say or the photos
OH
and this is a photo loaded post
I used cotton and a big hook size H
to make them chunky and rustic
if you want small and dainty
adjust the yarn and the size of the hook!!!
if you know how
make a magic loop
if you don't
look it up
or make a chain of 5 or 6 and join into a loop
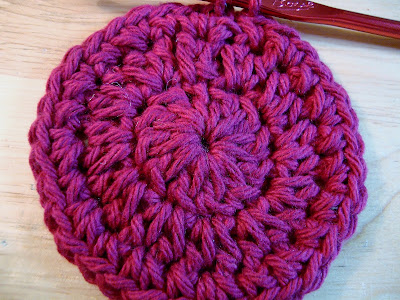
make 12 dc in the loop
join into first stitch with a slip stitch
row 2
make 2 half dc where you joined
and then
2dc into each stitch around
you will have 24 sts
join with a slip st
row 4
make 2 sc into same place you join
and then do this to the end
1sc
2sc
1sc
2sc
into each st around
join with slip stitch
row 5
change to white and sc all the way around
join with sl st
row 6
change to green
and do whatever edge you prefer
this is
3 dc shell
miss one sc
sc into next stitch
3 dc shell
miss one
etc
or you can just sc all the way around
or you can do the
backwards sc
aka the crab stitch
this is hard to write as you have to literally go backwards
but it is easy once you know how
make a sc as normal
then you have to sort of twist the hook to get it to go into the stitch to the RIGHT of the first st
yo pull thru and make a sc
if you have trouble I am sure there are tons of videos on youtube to help you
that is where I first saw it
it's my favourite edge for things like this
as it looks like a rope
when you get to the end of this last row
finish off as you do
weave in the few ends
and
VOILA
you got's yourself
a little
slice of
wattymelon
to put under your glass of summer drink
and soon you will have two
and then three
and then how ever many you want or need
I do hope you try it
coz I
know you will
really really like it
who wouldn't
:)
I used good old
Lily sugar and cream cotton
don't know the colour of the pink
but to me it says
wattymelon
and the green is sage green
but you use whatever you want
see
tomorrow morning I can put my
cafe latte
on it
and smile
!!!!!
if I made a mistake or you don't understand
let me know and we'll fix it
'
K?
'K!!!!!
xxx


We were thinking just a like today. Over in my garden the watermelons are for a bunting. Fun to see another version of the same idea. Great minds think a like don't they...too funny
ReplyDeleteSuper cute! I can't wait to give it a try! Thanks a lot for your sharing!!!
ReplyDeleteThese are so pretty, will definitely have a go.
ReplyDeleteYour wattymelons are just lovely! I don't like the taste of real wattymelon but these I do like a lot! I also like the term wattymelon - I won't call it anything else again - it's a wattymelon from now on!
ReplyDeleteI found you through your comment on The Garden Bell and what a wondrous find!!! Read three pages and can't wait to find the time to read all of your blog. Not even sure where you are from yet. Been wanting to try my hand at the lovers knot shawl, the link you posted is perfect and it looks fairly easy.
ReplyDeleteHi Marilyn, well, it seems we can post today but the followers gadget is missing from everyone's blog. :/ I've written down the pattern and will be making some later on. Not sure about that backward stitch though. Hope your day is a good one and free of slime. :) Tammy
ReplyDeleteLove the colours. I think this will be my next bicycle saddle cover. Looks nice and springy! Mia S
ReplyDeleteThanks for sharing...they are so much fun...I'll have to add these to my growing 'to do' list!
ReplyDeleteThanks so much for this pattern i actually just need the edging from it i have been looking forever and this is finally what i need! thanks!
ReplyDelete